Contents:
- What Are Orchids? A Brief Botanical Background
- 10 Orchid Varieties Worth Knowing
- Phalaenopsis (Moth Orchid)
- Dendrobium
- Cattleya
- Oncidium (Dancing Lady)
- Miltoniopsis (Pansy Orchid)
- Zygopetalum
- Paphiopedilum (Lady’s Slipper)
- Cymbidium
- Epidendrum
- Vanilla planifolia
- Choosing the Right Orchid for Your Home
- Understanding Orchid Light Requirements
- Using Grow Lights for Orchids
- How to Water Orchids Correctly
- The Sink Soak Method
- Water Quality Matters
- Fertilizing Orchids: How Much Is Enough?
- Potting Media: What Orchids Actually Need to Grow In
- Fir Bark
- Sphagnum Moss
- Semi-Hydroponic Growing (LECA)
- Temperature, Humidity, and Air Circulation
- Repotting Orchids: When and How
- Step-by-Step Repotting Process
- How to Get Orchids to Rebloom
- The Reblooming Timeline for Phalaenopsis
- A Reader Story: From Dead-Stick to Full Bloom
- Common Orchid Problems and How to Fix Them
- Yellow Leaves
- Root Rot
- Scale and Mealybugs
- Bud Blast
- Bacterial Rot (Crown Rot)
- Eco-Friendly Orchid Care: Growing Sustainably
- Complete Orchid Care Guide: Seasonal Care Calendar
- Spring (March–May)
- Summer (June–August)
- Fall (September–November)
- Winter (December–February)
- Buying Orchids in the US: What to Look For
- Propagating Orchids: Simple Methods for Beginners
- Division
- Keikis
- Orchid Myths Worth Debunking
- Frequently Asked Questions About Orchid Care
- How often should I water my orchid?
- Why isn’t my orchid blooming?
- How long do orchid flowers last?
- Can I grow orchids outside in the US?
- What is the white fuzzy stuff on my orchid roots?
- Taking Your Orchid Growing Further
What separates the orchid growers whose plants bloom year after year from those who watch their flowers fade and never return? The answer isn’t a green thumb — it’s understanding how orchids actually live. These are not fragile, fussy plants that exist to frustrate beginners. They are survivors, shaped by millions of years of evolution in some of the most demanding environments on Earth. Once you understand that, everything about caring for them starts to make sense.
This complete orchid care guide covers everything a beginner needs: the most rewarding varieties to start with, exactly how to water and feed them, the light conditions they prefer, and — perhaps most importantly — the specific steps that trigger reblooming. Whether you’ve just brought home your first grocery store Phalaenopsis or you’re eyeing a rare Cattleya at a specialty nursery, this guide gives you a practical, grounded foundation to work from.
What Are Orchids? A Brief Botanical Background
Orchids belong to the family Orchidaceae, one of the two largest flowering plant families on Earth. With over 28,000 accepted species and more than 100,000 registered hybrids, they represent roughly 6–11% of all flowering plant species. They grow on every continent except Antarctica, thriving in tropical rainforests, high-altitude cloud forests, grasslands, and even semi-arid regions.
Most of the orchids sold in the US fall into one of two growth categories. Epiphytes — by far the most common type in cultivation — grow on trees, drawing moisture and nutrients from the air, rain, and organic debris. Their roots are adapted to brief periods of wetness followed by fast drying. Terrestrials grow in soil, though often in very loose, well-draining mixes quite unlike typical garden dirt.
This distinction matters enormously for care. An epiphytic orchid sitting in dense potting soil — the kind you’d use for a tomato plant — will rot within weeks. Its roots need oxygen just as much as they need water. Matching your care routine to how the plant grows in nature is the single most important concept in orchid cultivation.
10 Orchid Varieties Worth Knowing
Not all orchids are equally beginner-friendly. Some require near-perfect conditions; others will thrive on a windowsill with minimal attention. Here are ten species and genera worth knowing, organized roughly from easiest to more advanced.
1. Phalaenopsis (Moth Orchid)
The most widely sold orchid in the United States by a significant margin — accounting for over 75% of all orchid retail sales. Phalaenopsis are tolerant of typical home conditions, prefer indirect light, and can bloom for three to five months at a stretch. They are the logical starting point for any beginner.
2. Dendrobium
A massive genus with over 1,800 species. The cane-type Dendrobiums commonly sold in the US produce tall pseudobulbs studded with flowers in shades of white, lavender, and deep purple. They prefer brighter light than Phalaenopsis and a distinct dry-cool rest period in fall to trigger blooming.
3. Cattleya
Often called the “corsage orchid,” Cattleyas produce large, fragrant blooms in vivid pinks, oranges, and purples. They need more light than most beginners can provide indoors — ideally a south-facing window or supplemental grow lights. The reward is spectacular flowers that can measure 4–7 inches across.
4. Oncidium (Dancing Lady)
Oncidiums produce long, branching spikes loaded with small, often yellow-and-brown blooms that flutter in the slightest breeze. Many hybrids carry a chocolate or vanilla fragrance. They adapt well to intermediate home conditions and tend to bloom in fall and winter.
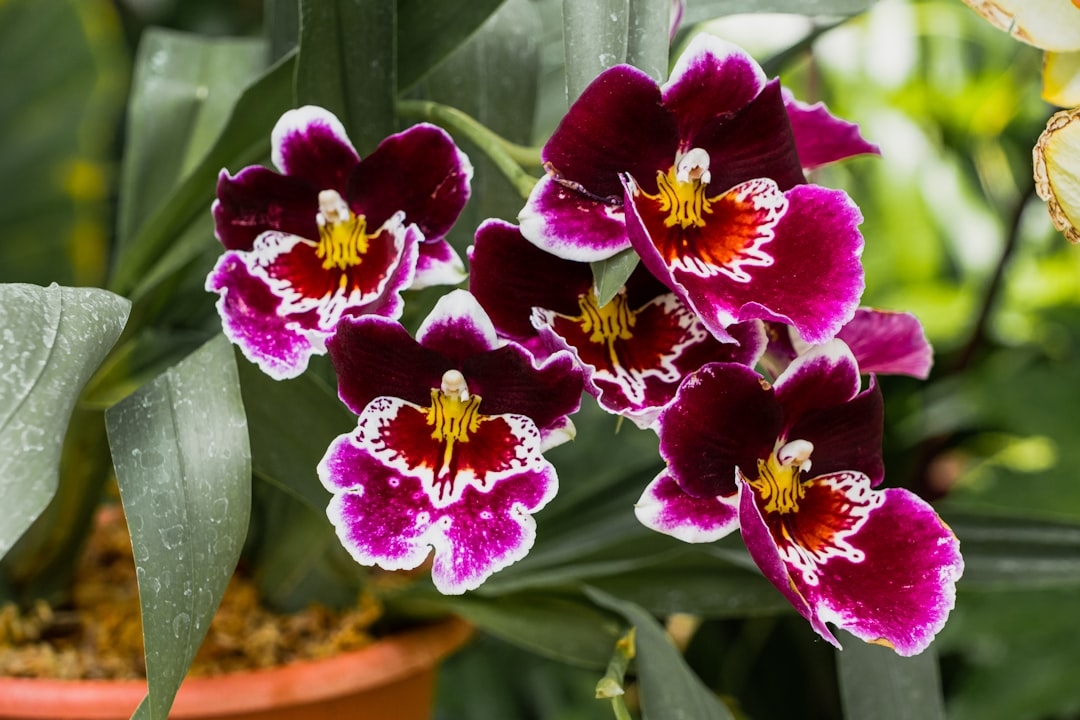
5. Miltoniopsis (Pansy Orchid)
Known for flat, velvety flowers that resemble oversized pansies, often with intricate “masks” of contrasting color at the center. They prefer cool temperatures (below 75°F during the day) and higher humidity, making them a better fit for the Pacific Northwest or a cool basement grow space than a hot apartment.
6. Zygopetalum
One of the most fragrant orchids in cultivation. Zygopetalums produce waxy, richly patterned flowers in green, purple, and maroon. They bloom in fall and winter, prefer intermediate to cool conditions, and grow reliably well under artificial lights.
7. Paphiopedilum (Lady’s Slipper)
These terrestrial orchids have a distinctive pouched lip that traps insects in nature. They come in two main groups: warm-growing types with mottled leaves, and cool-growing types with solid green foliage. Both prefer lower light than most orchids — ideal for north-facing windows.
8. Cymbidium
Cymbidiums produce elegant, arching spikes bearing dozens of long-lasting flowers. Standard types require cool nights (45–55°F) in fall to set buds — a challenge indoors, but manageable on a porch in USDA zones 8–10. Miniature Cymbidiums tolerate slightly warmer conditions and suit apartment growers better.
9. Epidendrum
Hardy, vigorous, and almost relentlessly blooming. Reed-stem Epidendrums can be grown outdoors year-round in USDA zones 9–11 and produce tight clusters of small, jewel-bright flowers. They’re forgiving enough that many growers treat them as garden perennials in warm climates.
10. Vanilla planifolia
Yes — commercial vanilla comes from an orchid. A vining epiphyte that can grow 30 feet or more in the wild, it is occasionally cultivated indoors as a novelty. It requires very bright light, a structure to climb, and hand-pollination to produce pods. It’s not a beginner plant, but it’s worth knowing it belongs to this family.
Choosing the Right Orchid for Your Home
Before buying, assess three things: the light available in your space, your typical indoor temperature range, and how much time you’re willing to spend. Most US homes sit between 65°F and 78°F — a range that suits Phalaenopsis, Oncidium hybrids, and warm-growing Paphiopedilums without any special equipment.
A south- or east-facing window gives you the most options. North-facing windows limit you to low-light tolerant species like Paphiopedilums. West-facing windows can work but tend to deliver harsh afternoon heat that stresses many orchids.
Budget also matters. A healthy, blooming Phalaenopsis from a grocery store or big-box retailer typically costs $15–$30. Specialty hybrids from an orchid vendor can run $40–$200 or more. For a first orchid, there is no reason to spend more than $25 — the same care principles apply, and the lower-cost plants are often quite robust.
Understanding Orchid Light Requirements
Light is the single factor most beginners underestimate. Not the total hours of light — the intensity of it. Orchid growers measure light in foot-candles (fc). Here’s a practical reference:
- Low light (500–1,000 fc): Paphiopedilums, Phalaenopsis
- Medium light (1,500–3,000 fc): Oncidiums, Zygopetalums, Dendrobiums
- High light (3,000–5,000+ fc): Cattleyas, Cymbidiums, Epidendrums
A basic light meter app on your smartphone — several free options exist for iOS and Android — can give you a rough reading in your space. Direct midday sun through an unobstructed south-facing window typically delivers 5,000–8,000 fc. Bright indirect light near a window might be 1,000–2,000 fc. A spot several feet back from a window may drop to 200–500 fc, which is insufficient for almost any orchid to bloom.
Leaf color gives you real-time feedback. Healthy Phalaenopsis leaves should be a medium, slightly yellowish green — not dark forest green (too little light) and not yellow or reddish (too much). Adjusting placement by even 12 inches toward or away from a window can make a meaningful difference.
Using Grow Lights for Orchids
Full-spectrum LED grow lights have made indoor orchid growing dramatically more accessible over the past decade. A quality LED panel delivering 2,000–3,000 fc at a distance of 12–18 inches, run for 12–14 hours daily, supports most intermediate-light orchids through even the darkest US winters. Look for lights with a color temperature between 5,000K and 6,500K for vegetative and blooming growth. Brands like Spider Farmer, Mars Hydro, and Barrina offer reliable options in the $40–$120 range.
How to Water Orchids Correctly
Overwatering kills more orchids than any other cause. The roots of epiphytic orchids — Phalaenopsis, Cattleya, Dendrobium, and most others — require a clear wet-dry cycle. They should get thoroughly wet, then dry out almost completely before the next watering.
A useful rule of thumb: water approximately once every 7–10 days in summer and every 10–14 days in winter, but always check the roots or growing medium first rather than following a calendar blindly. Phalaenopsis grown in clear plastic pots make this easy — green roots are adequately hydrated; silvery-gray roots need water.
The Sink Soak Method
The most reliable watering technique for beginners is the sink soak. Place the pot in a sink, run room-temperature water slowly over and through the growing medium for 30–60 seconds, ensuring it drains completely from all holes. Never let an orchid sit in standing water — even for a few hours — as this creates anaerobic conditions at the roots that invite rot. After watering, let the pot drain fully before returning it to its saucer or decorative cache pot.
Water Quality Matters
Orchids are sensitive to the mineral salts in hard tap water. Over time, these accumulate in the potting medium and can cause root tip burn and nutrient lockout. If your tap water is very hard (above 200 ppm dissolved solids), consider using rainwater, distilled water, or water filtered through a reverse osmosis system. Many dedicated orchid growers collect rainwater for free — a sustainable practice that also eliminates the cost and plastic waste of buying distilled water by the jug.
Fertilizing Orchids: How Much Is Enough?
Orchids in nature receive dilute nutrients constantly — from rain washing through decomposing organic matter, from dust, from bird droppings. In cultivation, the standard guidance is “weakly, weekly”: fertilize with a diluted, balanced formula every time you water during the active growing season.
A 20-20-20 or 30-10-10 formula diluted to one-quarter of the label strength — typically around 50–75 ppm nitrogen — is appropriate for most orchids in bark-based mixes. If you’re using sphagnum moss as your growing medium, reduce frequency to once every 2–3 weeks, as moss retains more moisture and nutrients than bark.
Switch to a bloom-booster formula with higher phosphorus (such as 10-30-20) in the last 4–6 weeks before your expected bloom spike to support flower development. Flush the potting medium with plain water every fourth watering to prevent salt buildup, which appears as a white crystalline crust on the pot rim or growing medium surface.
“The most common fertilizer mistake I see is over-concentration, not under-fertilizing. A weak solution applied consistently does far less damage than a strong dose applied infrequently. Orchid roots are delicate — treat fertilizer like a seasoning, not a meal.”
— Dr. Maren Klosterhoff, Certified Master Horticulturist and curator of the Pacific Orchid Society’s educational programs in Portland, OR
Potting Media: What Orchids Actually Need to Grow In
Standard potting soil is the wrong choice for almost all commonly cultivated orchids. It holds too much moisture, compacts around roots, and deprives them of the air circulation they need. Purpose-built orchid mixes create an open, chunky structure that drains fast and dries between waterings.
Fir Bark
The most widely used orchid medium in the US. Coarse fir bark (3/4-inch chunks) suits Cattleyas and large Dendrobiums; medium bark (3/8-inch) works well for Phalaenopsis; fine bark is used for seedlings or miniature species. Bark breaks down over 18–24 months and should be replaced when it begins to compact and retain moisture too long.
Sphagnum Moss
Long-fiber sphagnum moss retains significantly more moisture than bark — useful for Paphiopedilums and Phalaenopsis in very low-humidity environments. It also supports root growth visibly well. The tradeoff is higher rot risk if you tend to overwater. Choose sustainably harvested sphagnum from suppliers who practice renewable collection — several New Zealand exporters now offer certified sustainable product, and some US-based growers are experimenting with domestically grown alternatives to reduce import footprint.
Semi-Hydroponic Growing (LECA)
Lightweight expanded clay aggregate (LECA) — small, porous clay balls — is gaining popularity as an alternative to organic media. Orchids grown semi-hydroponically in LECA sit in a small reservoir of diluted fertilizer solution that the roots draw up by capillary action. The medium never compacts, never harbors fungus gnats, and lasts indefinitely. Transitioning an established orchid to LECA requires careful root preparation but delivers consistent results for growers who want a more hands-off system.
Temperature, Humidity, and Air Circulation
Most cultivated orchids prefer a temperature drop of 10–15°F between day and night. This differential is a key trigger for blooming in many species, particularly Phalaenopsis. A Phalaenopsis kept at 65–68°F at night for four to six weeks in autumn will typically initiate a flower spike. Daytime temperatures of 70–80°F are ideal for most warm-growing types.
Humidity between 50% and 70% suits the majority of commonly grown orchids. Most US homes average 30–50% relative humidity indoors in winter when heating is running — often too dry for optimal growth. Solutions include:
- Grouping plants together (transpiration raises local humidity)
- Placing pots on a shallow tray filled with pebbles and water (ensuring pot bases sit above the waterline)
- Running a cool-mist humidifier near your growing area
Air movement is equally critical and frequently ignored. Stagnant air around orchid leaves and roots promotes fungal and bacterial rot. A small oscillating fan set on low speed, positioned to create gentle air movement without blowing directly on the plants, dramatically reduces disease pressure and mimics the breezy conditions most orchids experience in nature.
Repotting Orchids: When and How
Orchids generally need repotting every 18–24 months — not because they’ve outgrown their containers, but because the potting medium has broken down. Decomposed bark holds water for too long and begins to exclude air from the roots, creating exactly the conditions that lead to rot.
The best time to repot is immediately after blooming ends, when new root growth is just beginning. Spring is ideal for most species in the US.
Step-by-Step Repotting Process
- Water the plant thoroughly 24 hours before repotting to make roots more flexible.
- Gently remove the plant from its pot. If roots are clinging, run warm water around the inside edge.
- Shake off all old medium and soak roots in a bowl of room-temperature water for 10–15 minutes to soften them.
- Trim all dead, rotted (brown, mushy), or dried-out roots with sterile scissors. Leave firm, white or green roots intact.
- Dust cut root ends with powdered cinnamon — a natural antifungal — or a commercial rooting powder containing fungicide.
- Select a pot only 1–2 inches larger than the root mass. Orchids bloom more reliably when slightly root-bound.
- Place the plant in fresh medium, positioning the oldest growth toward the back of the pot to allow new growth room to expand forward.
- Wait 3–5 days before watering to allow any cut surfaces to callous.

How to Get Orchids to Rebloom
This is the question most orchid owners eventually ask: the flowers faded months ago, the plant looks healthy, but nothing is happening. Reblooming requires understanding what the plant is waiting for.
For Phalaenopsis — the most common case — the trigger is temperature. A sustained night temperature of 55–65°F for a minimum of four weeks in late summer through early fall sends a clear signal that conditions are right to produce a spike. Many growers achieve this naturally by placing their plants near a drafty window or on an unheated porch in September and October before overnight lows drop below 50°F.
The Reblooming Timeline for Phalaenopsis
- Weeks 1–6: Cool nights initiate spike development at a node along the stem
- Weeks 6–10: Spike grows 1–3 inches per week under good light
- Weeks 10–14: Buds form and swell
- Weeks 14–18: First flowers open; bloom period lasts 8–14 weeks
For Dendrobiums and Cattleyas, the reblooming trigger is different: a dry, cool rest period in fall. Reduce watering to once every 14–21 days and stop fertilizing entirely from October through December. Resume normal care in January and expect blooming 6–10 weeks later.
A Reader Story: From Dead-Stick to Full Bloom
One of the most discouraging moments for new orchid growers arrives when the last flower falls and the spike turns brown. Maria, a home gardener in Austin, Texas, wrote about exactly this experience on an orchid forum. Her Phalaenopsis had been bare for seven months. She had kept it on a kitchen shelf, fed it consistently, watered it on schedule — everything the care tag said to do. What the tag didn’t say was that her kitchen, climate-controlled year-round at a steady 74°F, was never giving the plant the cool signal it needed. She moved it to her screened back porch for six weeks in September. By mid-November, a new spike had appeared. By February, she had nine open flowers. The plant hadn’t been struggling — it had simply been waiting for permission to bloom.
Common Orchid Problems and How to Fix Them
Most problems with orchids trace back to one of three causes: too much water, insufficient light, or pest pressure. Identifying the issue early prevents minor setbacks from becoming serious.
Yellow Leaves
The lowest, oldest leaf on a Phalaenopsis yellowing and dropping off annually is normal — it’s simply the plant cycling through its leaves. Widespread yellowing across multiple leaves, however, indicates overwatering, root rot, or severe underfeeding. Check roots first: healthy roots are white to green and firm; rotted roots are brown, hollow, and soft.
Root Rot
The consequence of overwatering or a waterlogged medium. At the first sign of brown, mushy roots, unpot the plant immediately, cut away all affected tissue with sterile shears, treat cut surfaces with cinnamon or diluted hydrogen peroxide (3% solution), and repot in fresh medium. Move the plant to a location with better airflow and reduce watering frequency.
Scale and Mealybugs
Scale insects appear as small, waxy brown bumps along stems and the undersides of leaves. Mealybugs look like tiny tufts of white cotton in the leaf axils. Both feed on plant sap and excrete honeydew, which can lead to sooty mold. Treat small infestations by swabbing with a cotton ball dipped in 70% isopropyl alcohol. For larger infestations, apply neem oil spray (2 tablespoons per gallon of water with a drop of dish soap as emulsifier) every 7 days for three applications. Isolate affected plants immediately to prevent spread.
Bud Blast
Buds that yellow and drop before opening — called bud blast — are usually caused by sudden environmental change. Moving a plant with developed buds to a different location, temperature fluctuation, exposure to ethylene gas (from ripening fruit or natural gas appliances), or allowing the medium to dry completely while buds are developing can all trigger this. Once buds are visible, minimize plant movement and keep conditions stable.
Bacterial Rot (Crown Rot)
Water sitting in the crown — the center growing point — of a Phalaenopsis can cause a foul-smelling bacterial infection that spreads rapidly into the leaves. Always water in the morning so excess moisture can evaporate during the day, and use a bulb syringe or paper towel to remove water from the crown after watering. Treat active crown rot with full-strength hydrogen peroxide applied directly to the affected area, then allow it to dry completely before watering again.
Eco-Friendly Orchid Care: Growing Sustainably
Orchids sit at an interesting intersection with environmental ethics. Wild orchid populations around the world face pressure from habitat loss and illegal collection — a concern serious enough that all orchid species are listed under CITES (Convention on International Trade in Endangered Species), which regulates their international trade. Buying from reputable US nurseries or growers who propagate plants via division or tissue culture, rather than collecting from the wild, matters.
There are several practical ways to reduce the environmental footprint of your orchid growing:
- Collect rainwater for irrigation instead of using tap water processed through municipal filtration systems.
- Compost spent bark rather than discarding it — decomposed fir bark makes a useful soil amendment for garden beds.
- Choose LED grow lights over fluorescent or HID lighting; LEDs use 40–60% less electricity for comparable output.
- Reuse pots by sterilizing them between uses with a 10% bleach solution, rinsing thoroughly, and air-drying.
- Buy from local orchid societies — most regional chapters host annual sales where hobbyists sell divisions of their own plants, eliminating shipping-related carbon emissions and often offering healthier, locally adapted plants at lower prices than online vendors.
The American Orchid Society maintains a directory of local chapters at aos.org. Many chapters offer free or low-cost educational workshops, lending libraries of orchid books, and mentorship programs for beginners — resources that make sustainable, knowledgeable growing more accessible.
Complete Orchid Care Guide: Seasonal Care Calendar
Orchid care is not static across the year. Aligning your routine with seasonal changes — even indoors — produces noticeably better growth and more reliable blooming.
Spring (March–May)
The most active growing season for most cultivated orchids. Resume full fertilizing after any winter rest. This is the ideal window for repotting. Inspect all plants for pest pressure as temperatures warm. Begin acclimating cold-sensitive types back to outdoor conditions gradually if you plan to summer them outside.
Summer (June–August)
High light intensity and warmth drive rapid growth. Many orchids produce new leaves, pseudobulbs, and roots during this period. Water more frequently as evaporation increases. Watch for spider mites in hot, dry conditions — tiny stippling on leaf surfaces and fine webbing on the undersides are early signs. Outdoor summering in dappled shade suits many epiphytic orchids and can dramatically improve their vigor.
Fall (September–November)
The critical season for bloom initiation in temperature-sensitive types. Allow Phalaenopsis to experience cool nights. Reduce water and fertilizer for Dendrobiums and Cattleyas entering their rest period. Bring outdoor plants back inside before overnight lows reach 50°F (most tropical orchids) or 40°F (cool-tolerant types like Cymbidiums in zones 8–9).
Winter (December–February)
Many orchids are in active bloom or approaching it. Keep fertilizing lightly (half-strength, every two weeks) for plants in bloom. Watch humidity carefully as indoor heating dries the air. Expect slower root and leaf growth — this is normal and does not indicate a problem. Avoid repotting during this period unless root rot forces the issue.
Buying Orchids in the US: What to Look For
A healthy orchid at the point of purchase saves considerable trouble later. When selecting a plant, check these specific things:
- Roots: Visible through the clear plastic grow pot — look for white or green firm roots, not brown or mushy ones
- Leaves: Firm, upright, free of spots, yellowing, or soft patches
- Crown: The center growing point should be intact, not brown or recessed
- Buds vs. open flowers: A plant with mostly buds still to open will provide a longer display in your home than one already at peak bloom
- Pests: Check the undersides of leaves and the leaf axils for scale, mealybugs, or sticky residue
Avoid plants displayed in standing water — a common sight at big-box retailers where plants sit in flooded trays. Even a few days of waterlogged roots can initiate rot that doesn’t become visible for weeks. If the pot is sitting in water, the roots may already be compromised.
Online specialty vendors — including Ecuagenera, Carter and Holmes, and Woodstream Orchids — offer a wider selection than any local store and typically ship well-packaged plants during appropriate weather windows. Expect to pay $30–$80 for a healthy specialty plant plus $15–$25 shipping. Many vendors include care instructions specific to the variety shipped.
Propagating Orchids: Simple Methods for Beginners
Most orchids cannot be propagated from cuttings the way houseplants like pothos or philodendron can. But there are practical methods that work well for home growers.
Division
Sympodial orchids — those that grow laterally, like Cattleyas, Oncidiums, and Dendrobiums — can be divided when the plant has accumulated enough pseudobulbs. Each division should have a minimum of three to five pseudobulbs to support healthy regrowth. Divide at repotting time using a sterile blade, dust the cut surfaces with cinnamon, and pot each division separately.
Keikis
A keiki (from the Hawaiian word for “baby”) is a small plantlet that sometimes forms spontaneously on a Phalaenopsis flower spike or Dendrobium cane. When the keiki has developed at least two or three leaves and roots that are 2–3 inches long, it can be carefully removed with a sterile blade and potted into fine bark or sphagnum moss. It will grow slowly for the first year but should bloom within two to three years.
Orchid Myths Worth Debunking
Several persistent misconceptions make orchid care seem harder than it is. A few worth addressing directly:
“Ice cubes are an appropriate watering method.” This advice appears on the care tags of many supermarket orchids and has been widely criticized by horticulturists. Phalaenopsis originate in tropical Southeast Asia — their roots did not evolve to process freezing water. Room-temperature water applied thoroughly and allowed to drain completely is always preferable.
“Orchids need special orchid fertilizer.” While formulas marketed as “orchid fertilizer” are widely available, a standard balanced fertilizer diluted to one-quarter strength performs equally well. The key variables are concentration and frequency, not brand.
“Dead spikes should always be cut off immediately.” On Phalaenopsis, a spent spike that remains green can sometimes produce secondary bloom branches (called laterals) from a node on the original stem. Many growers cut the spike back to just above the second or third node from the base and achieve a secondary bloom 8–12 weeks later before cutting the spike to the base entirely.
“Orchids are only for experienced gardeners.” Phalaenopsis, Paphiopedilums, and Oncidium hybrids are genuinely beginner-friendly plants that tolerate typical home conditions well. The reputation for difficulty largely stems from applying the wrong care — particularly overwatering — to plants that would otherwise thrive.
Frequently Asked Questions About Orchid Care
How often should I water my orchid?
Most orchids grown in bark-based medium need watering every 7–10 days during warm months and every 10–14 days in winter. Always check that the medium is nearly dry before watering again. Clear plastic pots make this easy — silvery-gray roots indicate it’s time to water; green roots still have adequate moisture.
Why isn’t my orchid blooming?
The most common reason is insufficient temperature differential. Phalaenopsis require 10–15°F cooler nights — around 55–65°F — sustained for 4–6 weeks in fall to initiate a flower spike. If your plant lives in a consistently heated space without seasonal temperature variation, it may remain vegetative indefinitely. Other causes include too little light and overly large pots that keep roots perpetually wet.
How long do orchid flowers last?
Phalaenopsis blooms typically last 8–14 weeks on the plant. Cattleyas last 2–4 weeks. Dendrobiums fall in the middle at 4–8 weeks. Keeping blooming orchids away from heat sources, cold drafts, and bowls of ripening fruit (which emit ethylene gas) extends flower longevity.
Can I grow orchids outside in the US?
Many orchids can be summered outdoors in all US zones when temperatures stay above 55°F overnight. Epidendrums can remain outdoors year-round in USDA zones 9–11. Cymbidiums tolerate brief frost and can overwinter outside in zones 8–10. Always provide shade cloth (30–50% shade) for plants not acclimated to outdoor light, and bring plants inside before overnight lows approach their cold tolerance threshold.
What is the white fuzzy stuff on my orchid roots?
Aerial roots on Phalaenopsis develop a coating of velamen — a spongy, white to silvery tissue that absorbs moisture and protects the inner root. This is completely normal and healthy. Velamen turns green when wet and reverts to white or silver as it dries. Do not remove or wrap these roots; they are functioning exactly as they should.
Taking Your Orchid Growing Further
The foundation of reliable orchid care is simple: match light intensity to the plant’s needs, water thoroughly and then allow full drying, feed consistently at low concentration, and provide the seasonal temperature and moisture cues that trigger blooming. These principles apply whether you have one Phalaenopsis on a kitchen windowsill or fifty species under grow lights in a basement setup.
The natural next step for anyone who finds themselves drawn deeper into orchid growing is to connect with a local orchid society. The American Orchid Society lists over 500 affiliated chapters across the US at aos.org. Monthly meetings, judged shows, and informal plant swaps offer both practical knowledge and access to varieties you won’t find at any retail store.
This complete orchid care guide gives you the framework. What happens next depends on which plants catch your attention, which blooms stop you mid-step when you walk past the growing shelf, and — eventually — which species you find yourself reading about at midnight because you just have to know more. That curiosity is where the real education begins.